Wednesday, August 30, 2006

Writing an Artist’s Statement

If you’re an artist, chances are someone has said, “What is your painting about?” or, “Explain this photograph to me,” or, “What the hell is that brown thing?”

It’s human nature to try to make sense of what we see. Writing an artist’s statement is a great way to help your viewers understand what they’re seeing. Even if you never share your written statement with anyone, just taking the time to sit down and write it out will help you talk about your work more easily.

Keep it (fairly) short
Write enough so that you can get your ideas across, but keep it to one page or less. Nobody wants to read a multi-paged artist’s statement. That’s what manifestos are for. Conversely, you might think your one-sentence artist’s statement (“I paint landscapes that are pretty”) is funny and ironic, but you might also come across as a gi-normous smart-ass.

Keep it simple
Avoid academic or flowery language. Even if you’re in grad school, your viewers will most likely include some non-artists and non-academics, so you don’t want to alienate them with sentences like, “I find this work menacing because of the way the subaqueous qualities of the figurative-narrative line-space matrix threatens to penetrate the essentially transitional quality.”*

I know. I read New American Paintings. That’s the way everybody in grad school (or who’s been to grad school) writes artist’s statements. Well, it’s just wrong. Don’t do it. Save all those big words for your prospectus or the paper you're going to present at CAA. They live for that.

Where to start
Think about a painting, photograph, or exhibit that you’ve seen that you loved, hated, or didn’t understand. What did you want to know about it? Did you wonder what materials the artist used? Why did she paint clowns? Why were the clowns so scary? Was the artist traumatized by a clown? How did she decide to combine photographs and painting? What is her process? Etc…

Then think about a time when someone was viewing your work and asking you questions. What did they want to know? What were they most curious about?

When I wrote my very first artist’s statement, I sat down and just imagined that I was talking to a non-artist friend about my work.

It's also really helpful to collect artist's statements when you go to shows. Or surf the internet and read the statements on artists' websites. You'll see examples of both good and bad statements. Be inspired by the good ones and know that you can do much better than the bad ones.

Start with the “Why?”
Why did you choose your particular subject matter or imagery? You can mention influences (artistic or otherwise), inspirations, and past experiences that led you to your subject. Some artists often refer to the work of other artists that inspired them. Others might be influenced by media or popular culture. Still others might have been traumatized by clowns… It doesn’t really matter how you came to your subject matter, but the viewer will be interested in knowing why you chose it.

Then talk about the “How?”
Most viewers will want to know something about your materials or your process, especially if the materials or processes are unusual. It’s not necessary to write a step-by-step guide to the watercolor process, or list every chemical that you used to process your photographs. You might just mention that you use watercolors and that you were drawn to them for their unpredictable nature and their transparency. Or you could briefly describe the process used to create cyanotypes and what made you love it. And if there’s an unusual technique or material, mention that. And seriously, what is that brown thing?

Act like you know what you’re doing
Avoid phrases like, “I want to…” or, “I’m trying to…” or, “My intention is…” Just say what you’re doing: “I expose the gritty underbelly of urban life…” or, “These paintings explore the wonders of nature and the beauty of our world…” Don't be wishy-washy about it.

Not so much “me,” “my,” and “I”
It’s hard to do, but try to avoid using the words “me, my, and I,” repeatedly. It’s annoying to read a whole page of sentences that start with “I.”

Update it
If you’re a working artist (creating new work often) then you’ll need to look at your statement every now and then to make sure that it still reflects your current work. A good rule of thumb is to update it every time you ship work off to a show. This keeps the statement fresh and helps you to prepare to talk about your work.

Multiple statements
Most artists only have one statement that they update every few months or as their work changes. You might have multiple bodies of work that require different statements, especially if you work in different mediums.

It’s so useful
Once you have a good artist’s statement, it will come in so handy in so many different ways:
1. Writing it will prepare you to talk about your work in formal or informal settings.
2. Frame it and hang it on the wall near your artwork to explain the work when you’re not there.
3. Use it as a basis for a press release when you’re promoting your show.
4. A reporter might use it to write a story about your show (if that’s all they have to go by).
5. Send it along with slides when you approach galleries.
6. Post it on your website along with images of your work.
7. Make your mom read it so she will finally understand.

* generated using the CRAP Generator – a grad school “must-have”
Wednesday, August 23, 2006

Hanging artwork

Recently I witnessed a couple of artists struggling to hang artwork. They would “eyeball it” - hang a couple of pieces, and when the pieces were not level, they would adjust the nails, putting unnecessary holes in the wall, causing frustration, and wasting a lot of time.

I’ve hung many shows with art groups, hung a lot of my own shows, and I’ve been a gallery assistant. I’ve learned a few tricks about hanging artwork quickly and easily.

Math
If you’re like me, you majored in art so you wouldn’t have to do math. And while you really don’t need all that algebra you learned, you do need to be able to do some basic adding and subtracting. So buck up, little artists! Luckily, we’re allowed to use calculators out here in the real world.

Tools
You’ll need a few basic tools for smooth installation:
Tape measure
Pencil and paper
Level
Hooks and nails
Calculator
Ladder
Glass or Plexiglas cleaner and paper towels (if necessary)
String (optional)

Preparation
Prepare your artwork for installation by attaching wire to the backs. Saw-tooth hangers are not reliable (and you won’t appear professional if you use them). It’s also recommended to put little rubber or felt pads on the back of the piece at the bottom. This helps to protect the wall from any paint rubbing off the frame. A bonus with the rubber ones – the can help keep the piece in place as you’re adjusting for level.

In some cases wire is not an option. You may need to hang the artwork using screws or you might need to make some sort of cleat. That’s a topic for another post.

Laying out the show
Bring all your prepared artwork to the space where it will hang. Start by spreading out the pieces and putting them against the wall where you think they might look good. Move the pieces around until you think they look perfect. Enlist an objective person to help with this.

Some things to consider – mixing up or grouping the artwork according to size, color, or theme. Some artists like to include one particularly strong piece on each wall. You might also consider hanging your strongest piece in the spot where the viewer will see it first upon entering the space.

The amount of work in the show is also important. You don’t want it to be sparse, but you also don’t want to overwhelm the viewer with too much to look at (unless, of course, that is your intent). Cay Lang touches on this in Taking the Leap:

“You should be able to look at each work of art without having the piece next to it insist on equal time. It is okay to glimpse other pieces with your peripheral vision, but it should be clear that each piece in the show is meant to be enjoyed as its own experience. If two paintings are placed too close together, they will be seen as one piece. Hanging too many pieces in a show is a common mistake of amateur artists, so a good rule of thumb is: Once you have placed the work, remove one piece from each wall.” (139)

Installation
OK, so now you have everything in its perfect spot. Let's get it on the walls.

Most artwork is best viewed with the center at eye level, which is usually at 60” from the floor. If you are hanging many pieces (and especially if you are hanging salon-style), it’s helpful to have a guide at the center point. You can create a guide by stretching a string across the wall at 60” (hang the string with nails or thumb tacks).

Gallery style
If you’re not grouping pieces together, this is a fairly quick and easy way to install artwork:

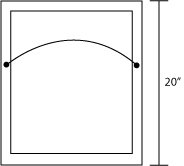
First, measure the height of your piece. Our example is 20” high

Figure half of that: 10”
Add that to 60”, so 70” (the top of the piece will be 70” from the floor)
Put the end of your tape measure on the wire and pull up a bit to find the distance from the top of the taut wire to the top of your piece. Our example is 5”

Subtract that from 10”, so that gives us 5”
Subtract that from 70”, so we will hang our nail at 65”

(This is really hard to describe in writing! Hopefully the graphics will help.)

Keep in mind that the wires will most likely be at different places on each piece, so you’ll need to measure the wire each time.

You’ll probably want to measure the distance between pieces, too, especially if they’re very close together.

Here’s a tip for doing that:
Figure the distance that you want to have between artwork: in our case, 20”
Measure the width of the next piece: 8”
Measure 28” from the edge of the first piece.
Then measure up 64” (our wire height changed on the second piece)

You also need to take into account the position of the hooks. The bottom of the hook will be where you make your mark on the wall. So the nail will actually go in the wall above your mark:
Salon Style (String method)
You’ll definitely want a string at 60” for this method.


Arrange all the paintings on the floor so that you’re happy with the way they work together.

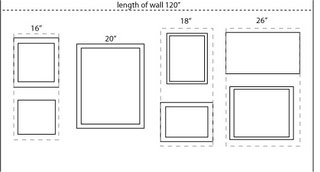
Measure the length of the wall: In our case, 120”

Measure the horizontal lengths of the paintings and add them together.
If there are paintings stacked on top of each other (we’ll call these a set), measure the widest one.
Add these measurements together: We get 76”
Subtract that number from the length of the wall: 120-80 = 40
Count the total numbers of sets of paintings and add 1: Our 4 sets + 1 = 5
Divide 40 by 5: 8 This is the amount of space that you will leave between sets of paintings and the walls.


Now decide how much space you want to put between the stacked or vertical pieces: We’ll choose 4”.

For the first set – add the heights of each painting and add the space between: This gives us 26”

Divide this by 2 and add to 60. (13 + 60 = 73)
This is where the top of the upper piece will be.
Measure the distance from the top of the painting to the wire: Ours is 4”
Subtract this from that larger number: 73 – 4 = 69
This is where the hook will go for the upper piece.

To figure where to put the hook for the lower piece, measure the distance from the top of the painting to the wire: Ours is 3”
Add this to the space between paintings that you chose at the beginning: 3 + 4 = 7)
Measure down 7” from the bottom of the upper piece. This is where you put the hook for the lower piece.


Theoretically, the center of the group should be at 60”:

To hang the next set of paintings, measure the width of the next set: in our case we only have one painting, and it’s 20” wide.
Figure half of the width: 10”
Add this to the distance between that we established earlier: 10 + 8 = 18
Measure 18” from the edge of the widest piece in the first set.
Then measure up 67” (using the method we used earlier).

Then measure up 67” (using the method we used earlier).
Continue on for each set.

This method also works for diptychs, triptychs, and other multi-paneled works.

Lighting
Once the artwork is in place, adjust the lighting. Climb up the ladder and adjust the spotlights so that the lighting is even over each piece. Lighting will vary from space to space. Some galleries have better lighting than others.

Labels
Some galleries will provide you with numbers to put on the wall that correspond to a price list. If you’re doing it yourself, you might want to make some labels. I prefer the clear address labels that you can get at office supply stores.

Standard label text:
Name of Artist
Title
media

Example:
Joe Schmo
Landscape Masterpiece
oil on canvas

The placement of the labels should be consistent. Standard placement is on the right side of the piece, at 48”:

Price List
Most galleries won’t put prices on the wall labels but will have a price list available for viewers to peruse on their own. Create a list that includes title, media, size, and price.

Example:
Landscape Masterpiece oil on canvas 24” x 36” $350

(note – size of artwork is generally listed height first - height" x width")

I hope this makes sense. It’s much easier to show someone how to do it than to try to write it all out.

If you have any questions, please leave a comment or email me at deanna at deannawood dot com

Wednesday, August 16, 2006

Rejection

It sucks to be rejected. Yes. We all know that. But can there be value in rejection? I think it all depends on how you look at it and how you handle it.

How you look at it... (Cliche alert!)

I think I might have already mentioned the best fortune cookie ever - it said, "If you don't get at least one rejection a day, you're not trying hard enough." That could apply to so many things besides trying to get your work into a gallery - getting a job, dating, etc.

I got another fortune cookie once that said, "The harder you work, the luckier you get."

And then, of course, there's the quote by Wayne Gretsky (I think) that goes something like, "You miss 100% of the shots that you don't take."

OK, enough with the cheesy quotes. You get the idea. You have to blanket the world with your proposals, letters, invitations, press releases, and whatever else you have to advertise and market your work. I've said it before - just stay true to your artistic vision and keep putting your stuff out there. Eventually someone will find it and love it.

So if you like numbers, you can figure out percentages - for example, I sent out 100 brochures and I got 20 outright rejections, 15 positive letters, and 3 possible leads on gallery representation... This can help you determine your future marketing strategies.

How you handle it...

I've heard a lot of different stories about how people handle rejection. I think most artists keep their rejection letters. The ones who "make it" look back on them and remember how hard it was to achieve success. I read about one artist who wallpapered his bathroom with his rejection letters. I love that idea.

One artist posts her rejection (and acceptance!) letters on her blog, Rejection Letters of an Emerging Artist.

The Rejection Collection is a website touted as the "writer's and artist's online source for misery, commiseration, and inspiration." You can submit your rejection letters and describe how they made you feel, and read other artist's rejection letters. Misery loves company! The links page has a lots more good sites to check out. There are other writers and aritsts who actually scan in and post their rejection letters on their websites.

I read somewhere about an artist who, when he received a rejection letter, would send his own rejection letter. Saying something like, "I regret to inform you that I am not accepting rejection letters at this time." Or something like that. Funny.

Personally, I do get a little depressed when I receive a rejection letter from a gallery that I really liked or a show that I really wanted to get into. But I just file it and try to figure out what to do next. Well, that didn't work out, what can I do now?

The only thing that really really bothers me is this (venting alert!) - I send my brochure and a cover letter to galleries that I have researched online. For a while I would often not receive anything back (not even a form letter), so I started to include a SASE. This upped the amount of rejection letters (what was I thinking?), but a couple of galleries have sent back my letter and brochure to me with nothing. Not even a form letter. One of them wrote, "This is not for us," on MY cover letter and sent it back. I realize that gallery people are busy and they get a gazillion submissions a month, but that's just rude!

When I do receive a personalized note, I really appreciate it. I will often email the person to thank them for taking the time to respond personally.

So how do you handle rejection?

Wednesday, August 02, 2006

Juried Shows

Being in juried shows is a great way to get more exhibitions on your resume.

What is a juried show?
Usually an art group, gallery, art center, or museum will sponsor the show (by recruiting volunteers, raising money for prizes, and securing a venue for the exhibition). Some will use their own "expert," (or panel of experts) but most will hire a juror (or jurors) from outside of their organization. This ensures that the juror will be fair and impartial. The juror is usually an artist, curator, or art educator.

How it works
The organization will send out a prospectus or call for entries, usually a small brochure that is mailed to members, former show participants, etc. Many calls for entries are posted on websites such as the Art Deadlines List or printed in magazines such as Art Calendar or Art in America.

The prospectus
It is very important to read everything in the prospectus before you enter the show. These are the rules and regulations and if you don't follow them, you can ruin your chances of getting in the show.

Important things to note on the prospectus:
deadline for entries - sometimes they will list the postmark date and sometimes the date that items must be in their possession (an important distinction)

entry fee - obviously, they won't accept your entry without the fee

slide or file requirements - more shows are taking digital entries now, but regardless of the format you submit, follow their guidelines to the letter. If they want slides and you enter a CD, your entry will be thrown out, and vice versa. Also, if they indicate that digital files should be 72 dpi jpgs, don't send them 11 x 17 TIFFs. They won't like you.

Some smaller organizations will sponsor local or regional shows where the artists are required to submit actual artwork instead of slides or digital files. The juror will select work and give prizes from the actual artwork.

exhibition dates - I mention this because some organizations require the entries months in advance of the show. You need to decide if you want to have your work unavailable for that period of time. Also, you must make sure that your work is available if it is accepted - don't enter the same piece in multiple shows if the dates overlap.

handling fees - I've noticed that some organizations are requiring artists who are accepted into the show must pay an additional handling fee.

How do you choose which shows to enter?
There are many things to consider when entering shows. Here are just a few:
cost - personally, I don't enter shows that charge more than $25 for their entry fees. The benefit of having a line on your resume is weighed with the cost of the entry fee, framing, shipping, and insurance. Entering shows is expensive, and getting into shows is even more pricey...

juror - the status and reputation of the juror is important. I tend to look for an artist that I know of and admire or a curator of an institution that I respect. But sometimes I will also enter a show that just sounds interesting, regardless of who the juror is.

location - is the exhibition being held at a major museum or a respected art center? If the show is local, you can save on shipping costs.

Congratulations! You got into the show!
Now what? The organization will send you instructions on shipping your work to them. Usually, they will require that you use a particular shipping agent and that the work will need to arrive within a particular time frame. Most organizations will require that you pay for return shipping also. I need to do a whole post on shipping artwork in the future.

If you're lucky, they will post images of the installed work on their website. If you're super lucky, they'll also print a catalog of the exhibited work. If there is any press on the show, they will probably send you copies of the newspaper clippings, too. And if you're extra-super lucky, the reporter will mention your work (in a good way). All of this is great stuff to add to your "brag book" or whatever you call that binder full of show catalogs, press clippings, and invitations.

Prizes
Many juried shows will entice artists to join by offering prizes. They'll usually list the major prizes - $500 best of show, three $100 awards, merchandise awards, etc. Sometimes the best of show will receive a solo show in the gallery in the future. Prizes are great, but don't enter a show expecting to win.

We regret to inform you...
Bummer. It sucks to get rejected. Don't worry about it, though. Try again next year. Art is subjective and every juror will have a different opinion on the same work. One particular painting can win best of show in one show and be rejected from another. Every juror brings his or her own aesthetic background, artistis criteria, taste, etc. But I don't need to tell you that.

The more shows you enter, the more you increase your chances of getting into one. But it does get expensive, so decide what's important to you before you enter a whole bunch of shows.

Good luck!